Performance(Last update of this topic: 05-14-2024) |
  
|
(Last update of this topic: 05-14-2024)
Performance(Last update of this topic: 05-14-2024) |
|
This chapter describes how to carry out the remote installation of a printer on the selected print servers. Ideally, the optional information for location, DNS and DHCS have been stored so that the installation can be largely automated.
Printer Installation
In order to install a printer on the print server via the WebCenter the change to the desired print server/folder level is necessary (see figure steadyPRINT WebCenter: Create remote printer installation). From there, switch to the Options and then click Install printer.
First select the printer model to automatically fill in the printer name based on the selected naming scheme and the respective properties. If the optionally configurable custom fields and the infrastrucutre parameters have been maintained, the WebCenter automatically fills in the following properties based on the available information:
| - | Printer name: The naming scheme specifies which variables are to be used. Infrastructure information and linked custom fields are retrieved. |
| - | Driver: If the driver is stored in the printer model, it is used here. |
| - | Port name: Is filled automatically using the DNS information. |
| - | DNS/IP Address: Is filled automatically using the DNS information. |
| - | IP Address for DNS/DHCP: The first free IP address will be used for the DHCP reservation. For this purpose, the WebCenter uses the linked infrastructure parameters to read the free IP addresses from the respective DHCP range. Alternatively, a different IP address can be selected or the IP address can be entered freely. |
In the right-hand area of the interface you will find the installation setting. The following configuration option are available:
| - | Create DHCP reservation: Automatically creates the DHCP reservation using the MAC and IP address as well as the DNS name from the port details |
| - | Create DNS entry: Automatically creates the DNS entry from the port details. |
| - | List of print servers: Installs the printer on all selected print servers. |
Once all fields are filled and the desired settings have been made, the printer installation is started via the button Install. Before the installation starts, the WebCenter creates the printer with the specified information on the selected print server/folder level.
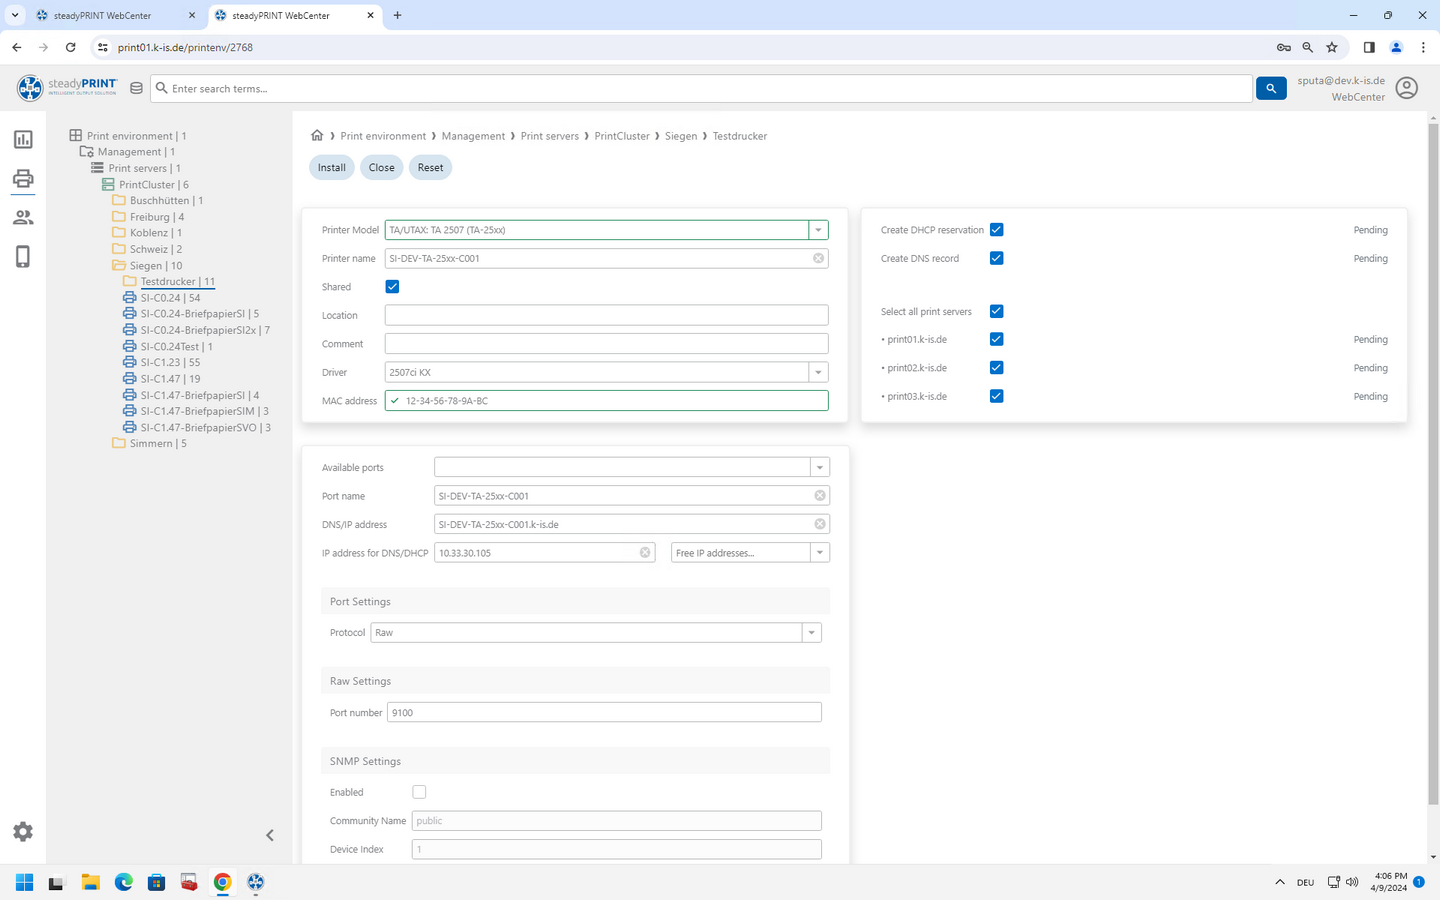
Figure 35: steadyPRINT WebCenter: Create remote printer installation
Note: Do not close the browser or change the view in the WebCenter during the installation.
Note: The printer installation does not install the driver selected for the printer. It must already be installed on the selected print.
Uninstall Printers
To uninstall a printer, first select it in the tree first. The uninstallation is then performed on all referenced print servers via the Uninstall button. If the DNS and DHCP environment is configured respectively, steadyPRINT will remove the DNS entry and the DHCP reservation.