Configuration(Last update of this topic: 05-14-2024) |
  
|
(Last update of this topic: 05-14-2024)
Configuration(Last update of this topic: 05-14-2024) |
|
This chapter describes the required configuration of the environment in order to automatically assign printer names and create the DHCP reservation and entry. These steps are optional but extremely helpful in order to implement the greatest possible automation during printer installation and integration.
DNS and DHCP
When installing printers via the WebCenter, steadyPRINT offers the option to automatically create DNS entries and the DHCP reservation. For this purpose, the specification of DNS zones and DHCP areas is required.
Computer
First of all, the DNS and DHCP servers have to be created via Settings > Infrastructure > Computer. When creating, it is important to assign the two roles DNS and DHCP server (see figure steadyPRINT WebCenter: Create computer with DNS and DHCP role).
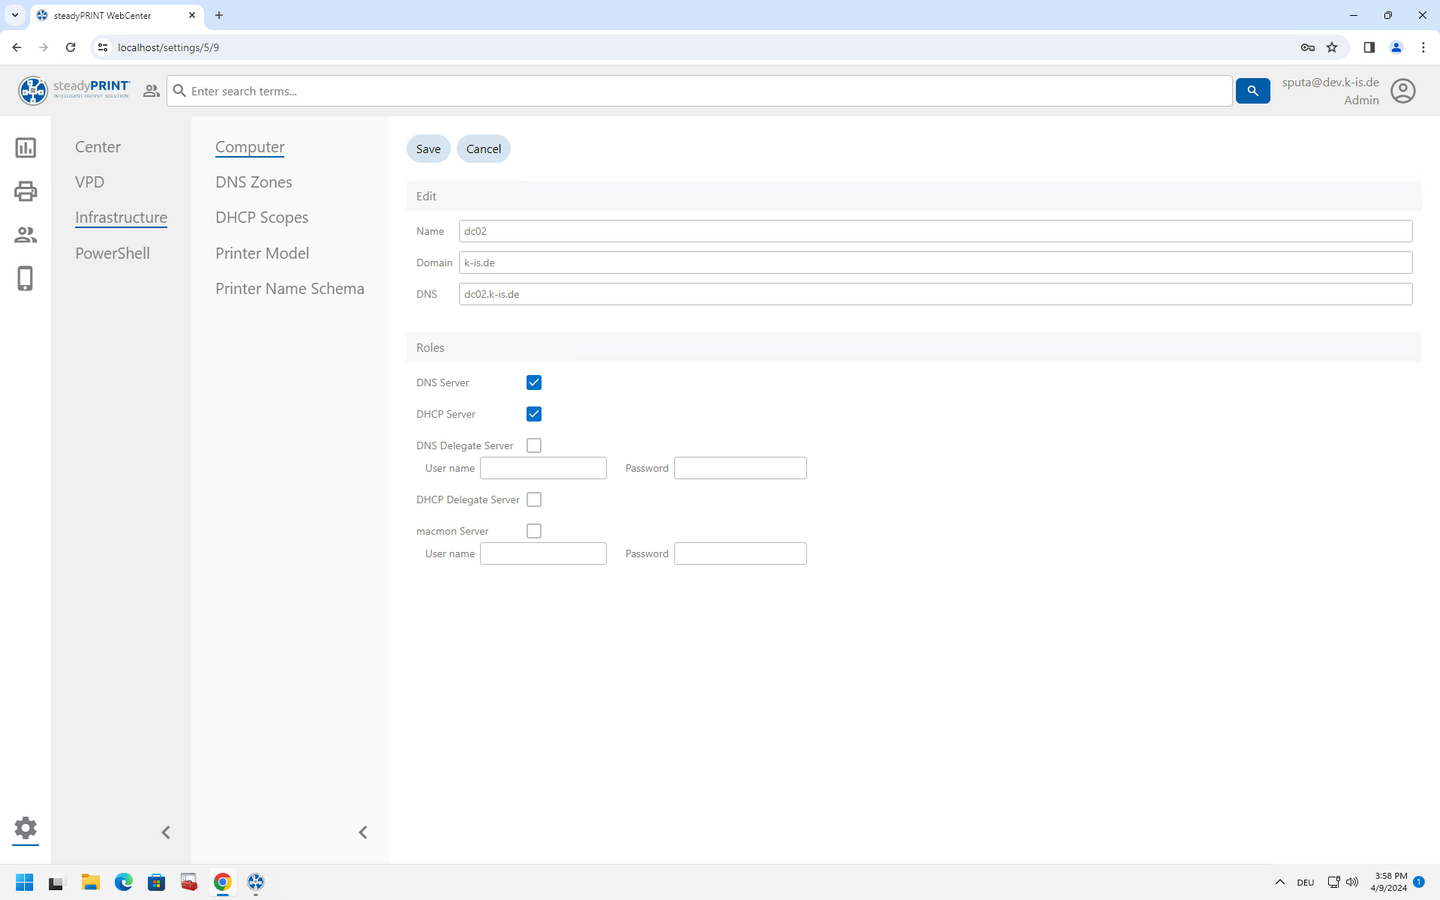
Figure 27: steadyPRINT WebCenter: Create computer with DNS and DHCP role
In addition, the Delegate Server for writing the DNS entries and DHCP reservations is to be configured (see figure steadyPRINT WebCenter: Create computer with DNS and DHCP role as Delegate Server).
| • | For the role DNS Delegate Server, a service user incl. password must be stored in steadyPRINT. Moreover, it is important to assign the authorization for the user who must be added to the AD safety group "DNSAdmins" for the access to the DNS server. |
| • | For the role DHCP Delegate Server, a service user incl. password must be stored during or after the installation of the service steadyPRINT Server. The service user must be added to the AD safety group "DHCP Administrators" so that the DHCP server can be accessed. Also make sure that the service user on the Delegate Server is local administrator and has been added to the local safety guideline "Login as service". |

Figure 28: steadyPRINT WebCenter: Create computer with DNS and DHCP role as Delegate Server
DNS Zones
The DNS zones for an automatic creation of DNS entries can be stored in the settings of the WebCenter under Settings > Infrastructure > DNS Zones (see figure steadyPRINT WebCenter: Create DNS zones). During the printer installation, steadyPRINT creates the entries on behalf, if required. The link is created later as a user-defined field on print server/folder level.

Figure 29: steadyPRINT WebCenter: Create DNS zones
Note: This function requires the configuration of a DNS Delegate Server.
DHCP Areas
The DHCP areas for an automatic creation of DHCP reservations can be stored in the settings of the WebCenter under Settings > Infrastructure > DHCP Areas (see figure steadyPRINT WebCenter: Create DHCP areas). During the printer installation, steadyPRINT creates the entries on behalf, if required. The link is created later as a user-defined field on print server/folder level.
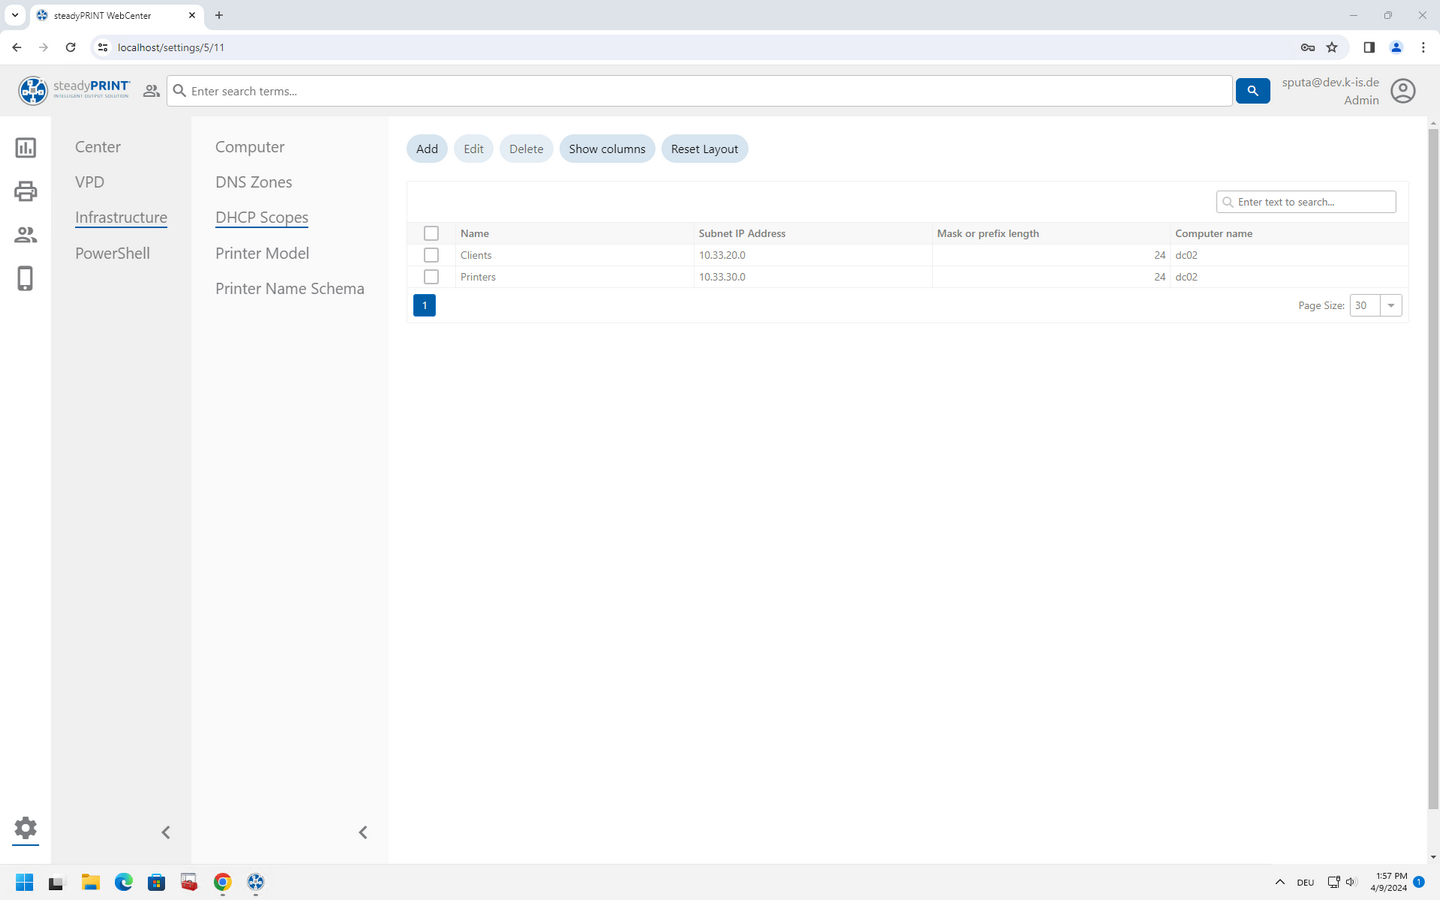
Figure 30: steadyPRINT WebCenter: Create DHCP areas
Note: This function required the configuration of a DHCP Delegate Server.
Printer Model
Printer models can be managed via the WebCenter and also be used for the automatic naming of printers (see figure steadyPRINT WebCenter: Create printer model). The definition is made via the manufacturer including the complete model name with model code as well as the specification of the related printer driver. Depending on the configuration, the model code and printer driver can be used during the printer installation.
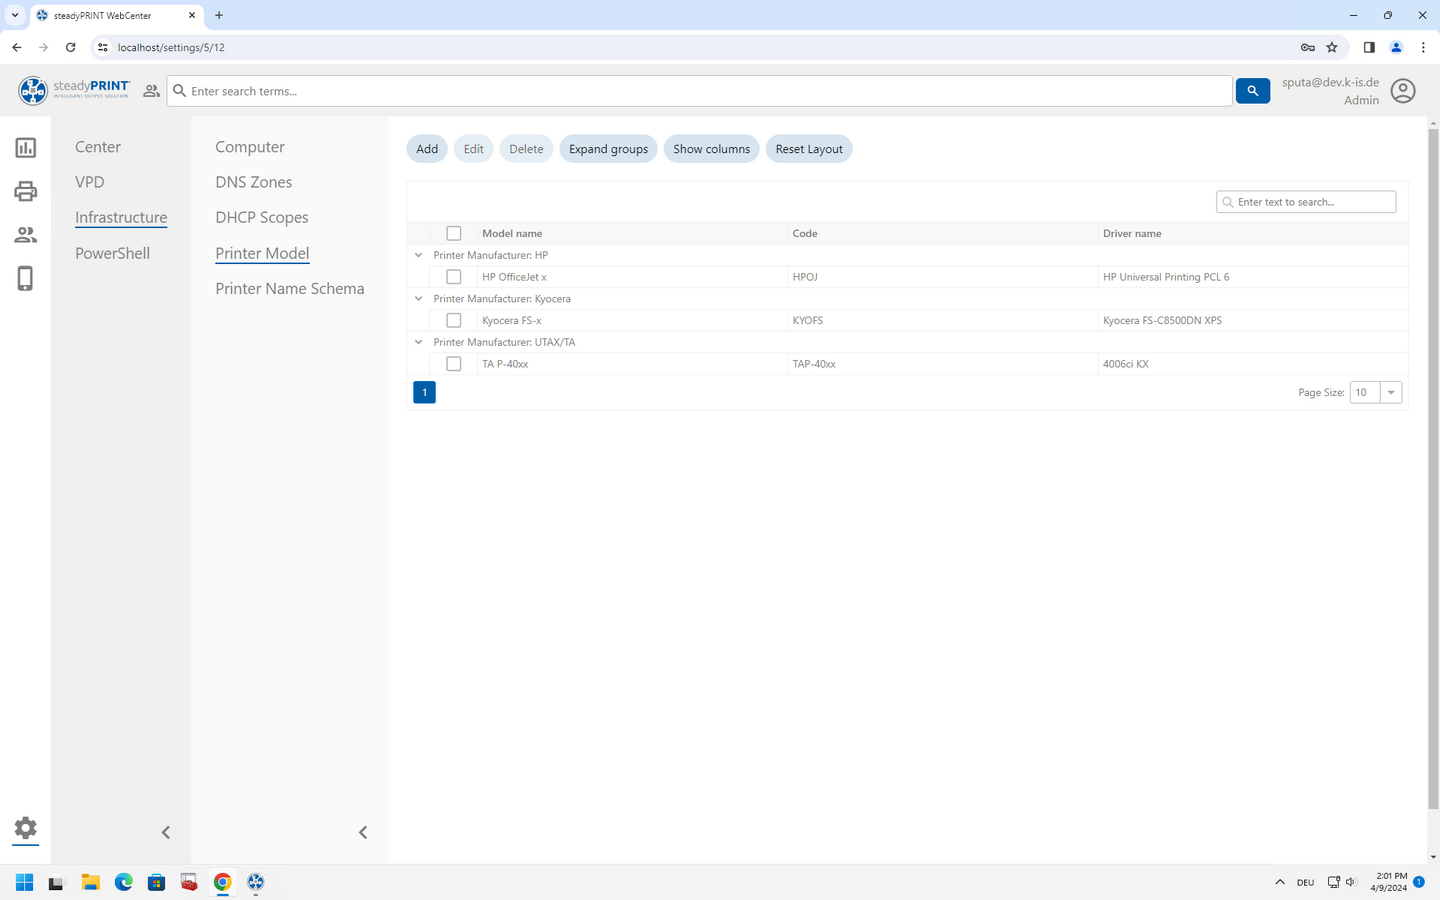
Figure 31: steadyPRINT WebCenter: Create printer model
Note: In order for the driver selection to be filled, a synchronization of the used print servers is first required. This can be done directly via the views for the print server in the Desktop Center as well as in the WebCenter. Usually this is done automatically while adding print servers and printers.
Naming Scheme
steadyPRINT supports different naming schemes when creating printers via the WebCenter. The selection of which are used during installation is made via the settings under WebCenter > Settings > Infrastructure > Printer naming scheme (see figure steadyPRINT WebCenter: Select naming scheme). The various definitions include variables which the WebCenter automatically replaces with available values. The arrangement of the respective variables and default values in the name pattern can be modified individually. The following variables are available:
| - | printerName: A continuous and pre-defined name. |
| - | modelCode: A model code stored and linked via custom fields. The link is created as a custom field on print server/folder level. |
| - | locationCode: A unique code for a location. The link is created as a custom field on print server/folder level. |
| - | departmendCode: A unique code for a (specialist) area or department. The link is created as a custom field on print server/folder level. |
| - | objectCode: A unique code for a building or building section. The link is created as a custom field on print server/folder level. |
Additional default values and individual fields of "text" type for the respective naming scheme can be added in the same way as the location information described above. Manipulate an existing scheme and create custom fields according to your own wishes.
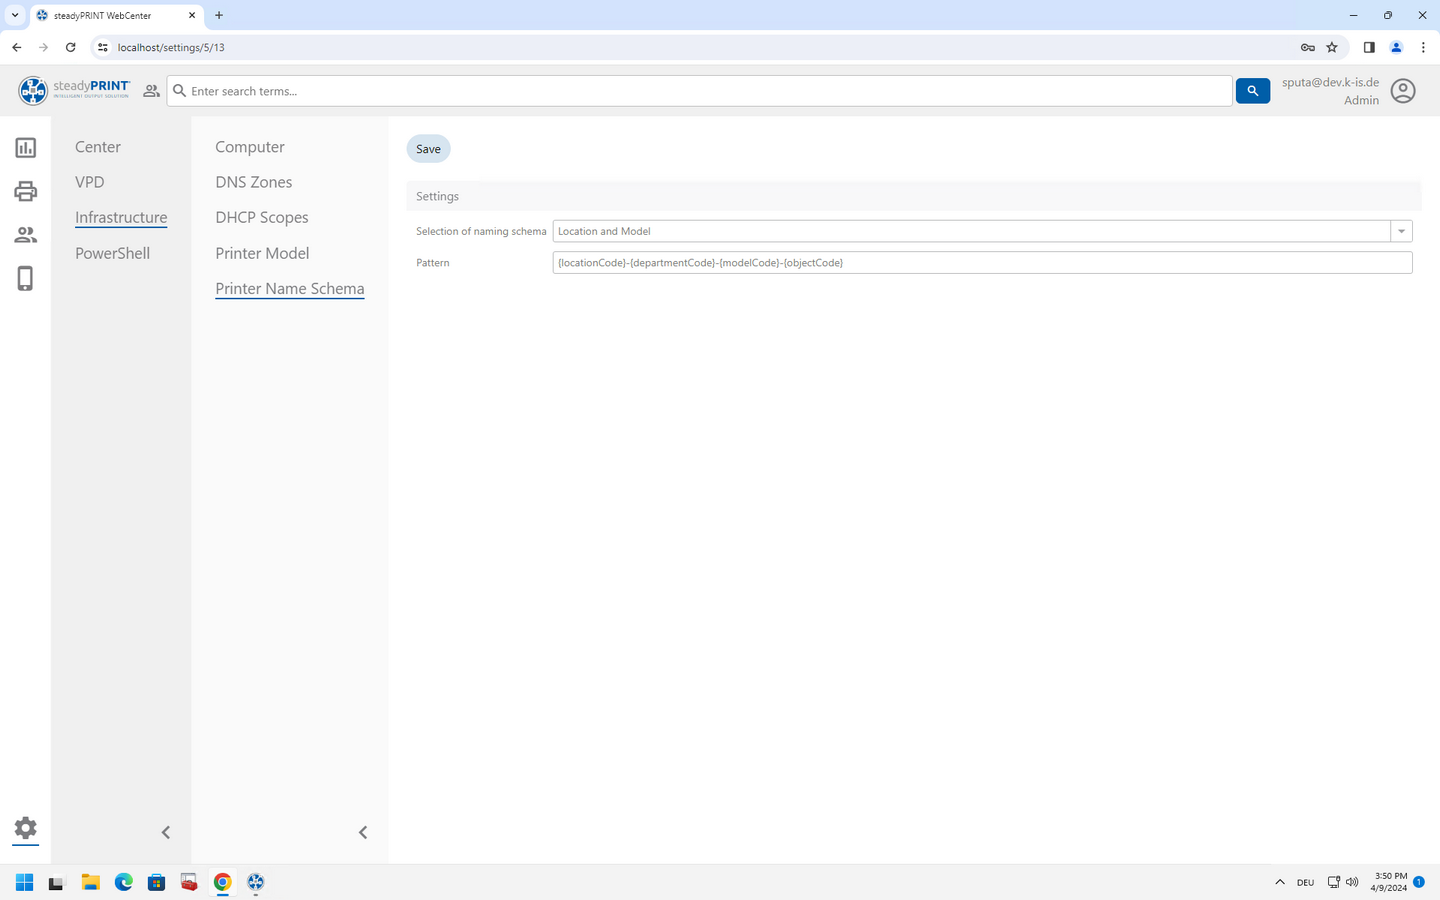
Figure 32: steadyPRINT WebCenter: Select naming scheme
Note: It is essential to ensure that the variables are written correctly, otherwise it will not be possible to assign the values. There is no checking of upper and lower case letters. However, it is important whether the words are written together or separately. The English field name is used to map the fields to the naming scheme.
Custom Fields
The definition of the two required fields for DNS and DHCP is done in the settings of the steadyPRINT Center (Settings > Custom Fields).
First, a new field of the type „DNS Zone“ has to be created (see figure steadyPRINT Center: Create custom field - DNS zone). The information for the DNS zones are determined automatically.
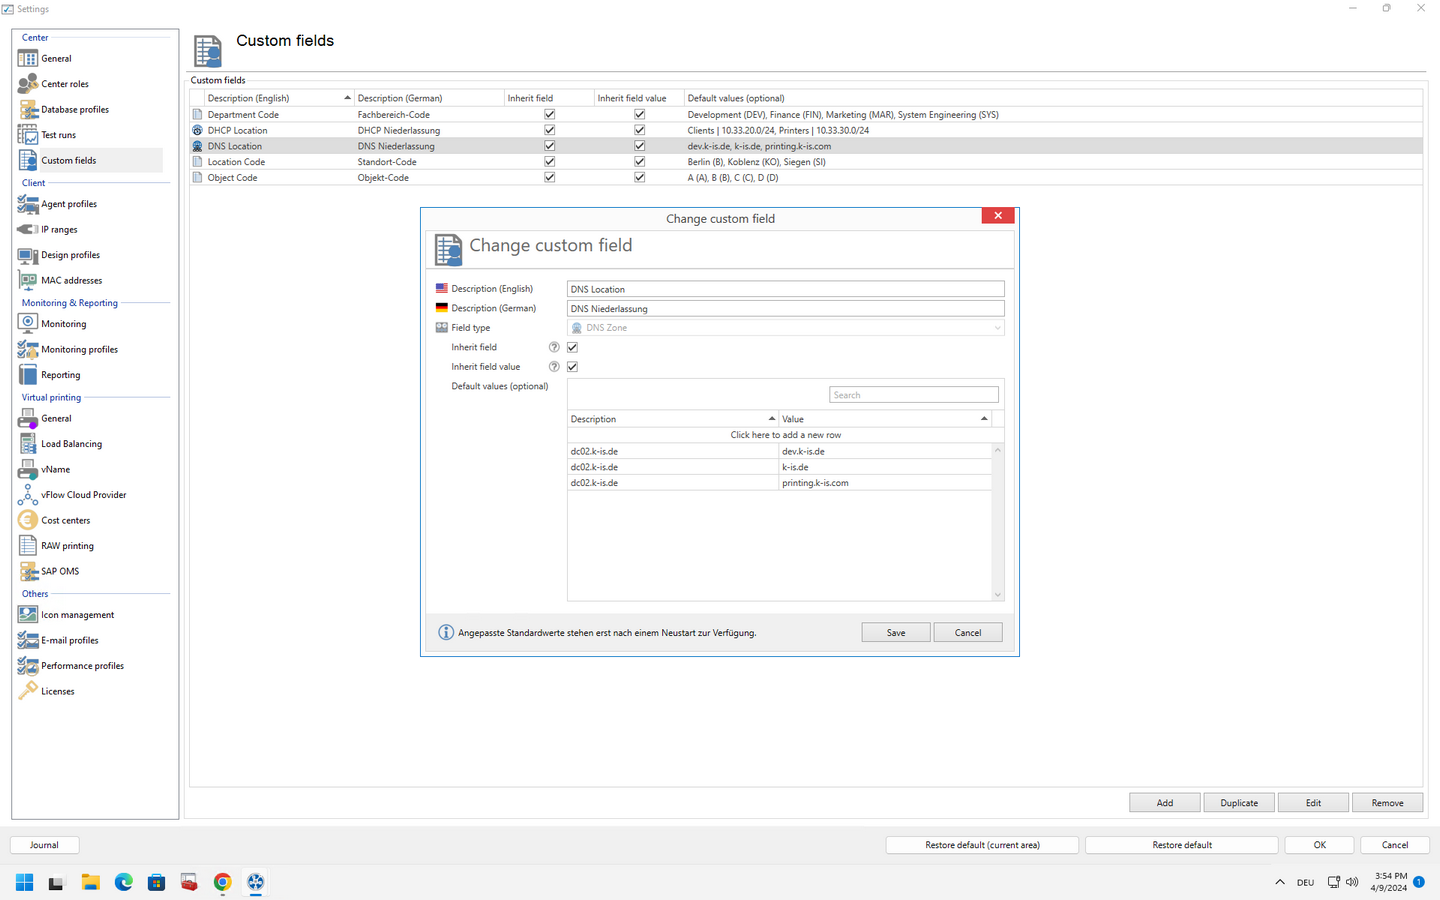
Figure 33: steadyPRINT Center: Create custom field - DNS zone
The next step is to create another new field of the type „DHCP Scope“ (see figure steadyPRINT Center: Create custom field - DHCP area). The information for the DHCP areas are determined automatically.

Figure 34: steadyPRINT Center: Create custom field - DHCP area
Finally, fields of the "text" type are to be created analogous to the naming scheme LocationCode, DepartmentCode and ObjectCode in order to map location information (see figure steadyPRINT Center: Create custom field - code for specialized area, figure . steadyPRINT Center: Create custom field - code for location and figure steadyPRINT Center: Create custom field - code for object). In this context, the list with default values can be filled individually which allows an easier selection when linking the values. If the locations are not to be shown in the naming scheme, the fields just mentioned do not need to be created.
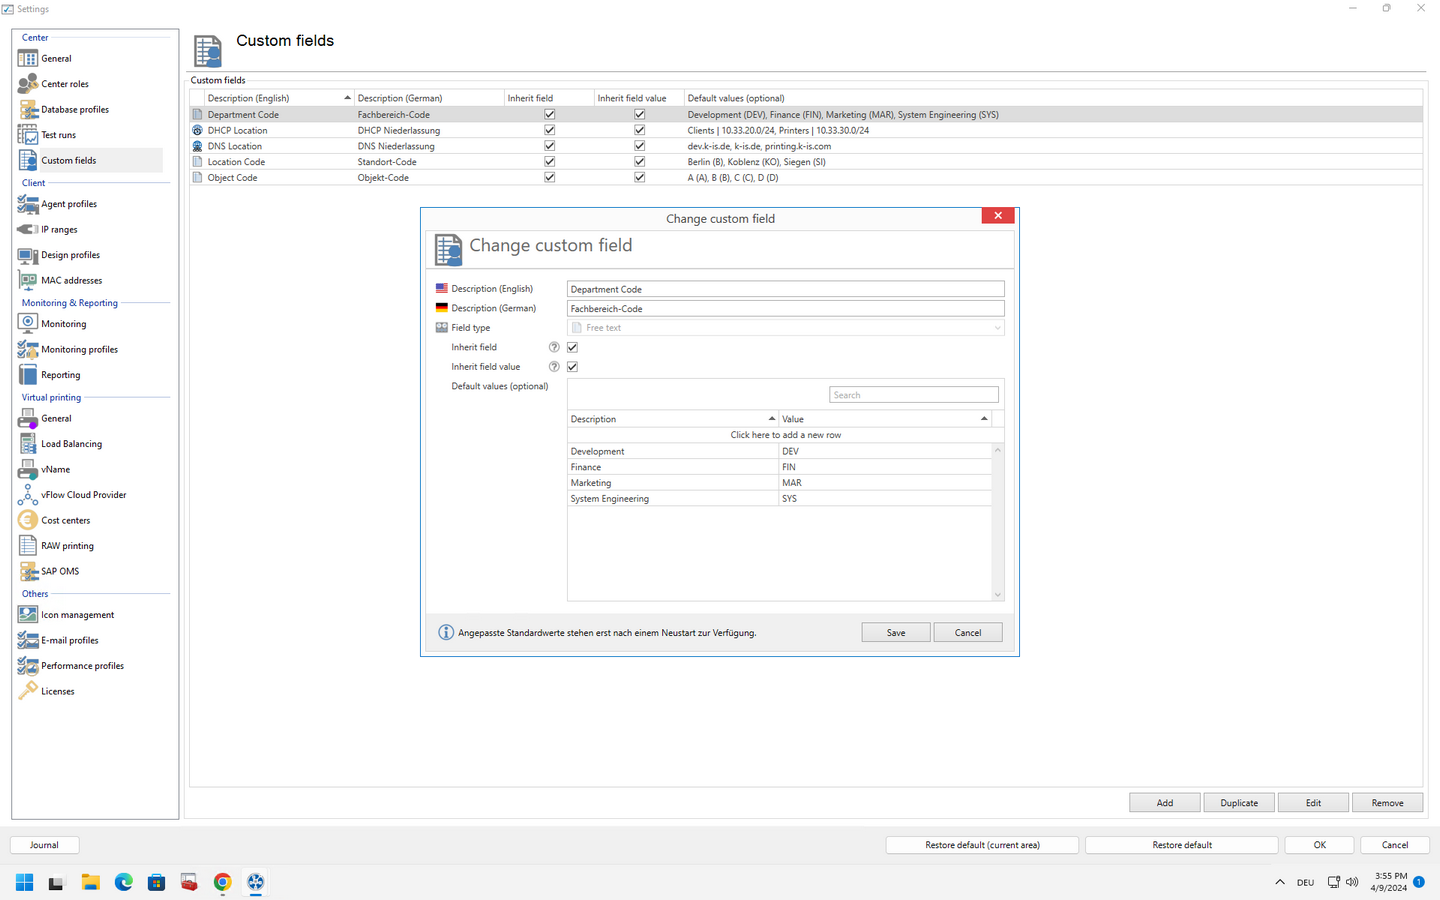
Figure 35: steadyPRINT Center: Create custom field - code for specialized area
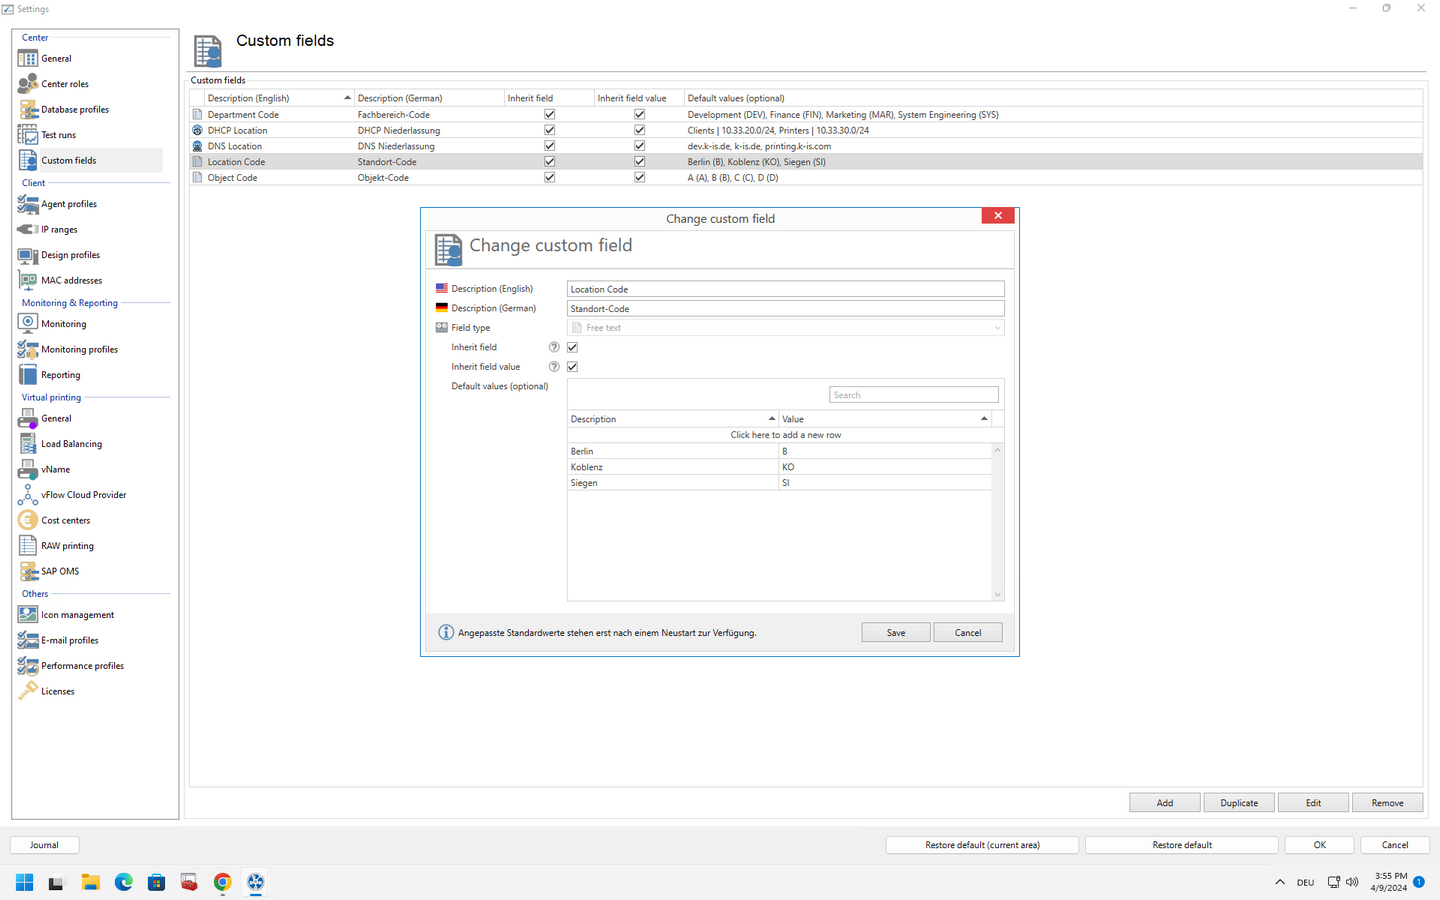
Figure 36: steadyPRINT Center: Create custom field - code for location
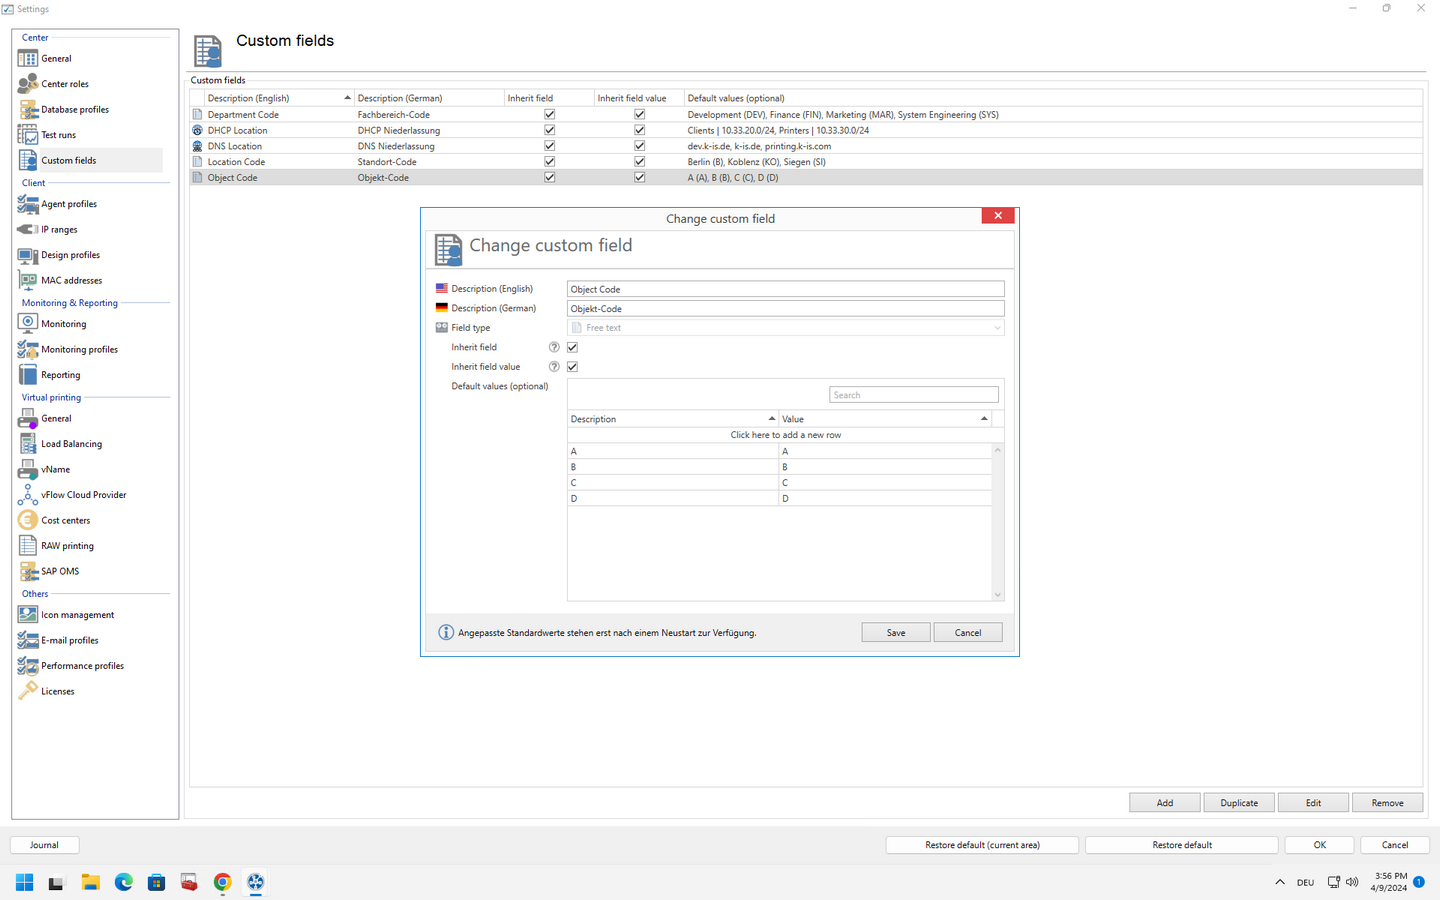
Figure 37: steadyPRINT Center: Create custom field - code for object
Once all fields have been created, the link can now be created on print server/folder level. For this purpose, it is advisable to create the respective locations and/or areas as folders in order to link or store DNS/DHCP information or location information at the desired level. The link is created via the settings of a folder in the tree under "Add custom fields" (see figure steadyPRINT Center: Assign custom field).
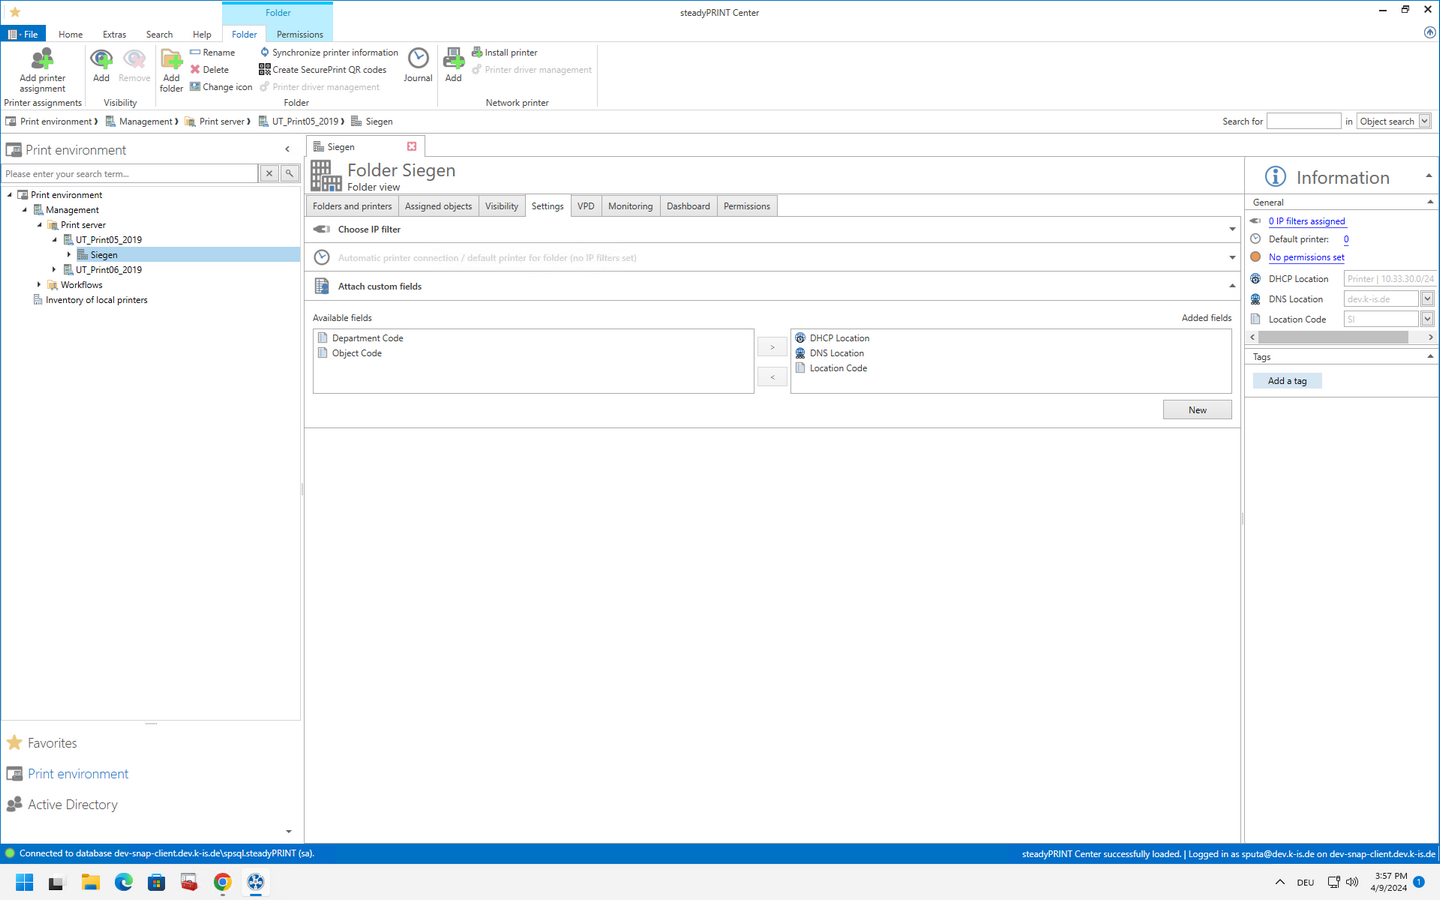
Figure 38: steadyPRINT Center: Assign custom field