(Last update of this topic: 05-22-2015)
The steadyPRINT functions shown and described so far have been presented from a server-side, administrative perspective. We would like to show you the following additional client-side printer administration functions that steadyPRINT is able to offer.
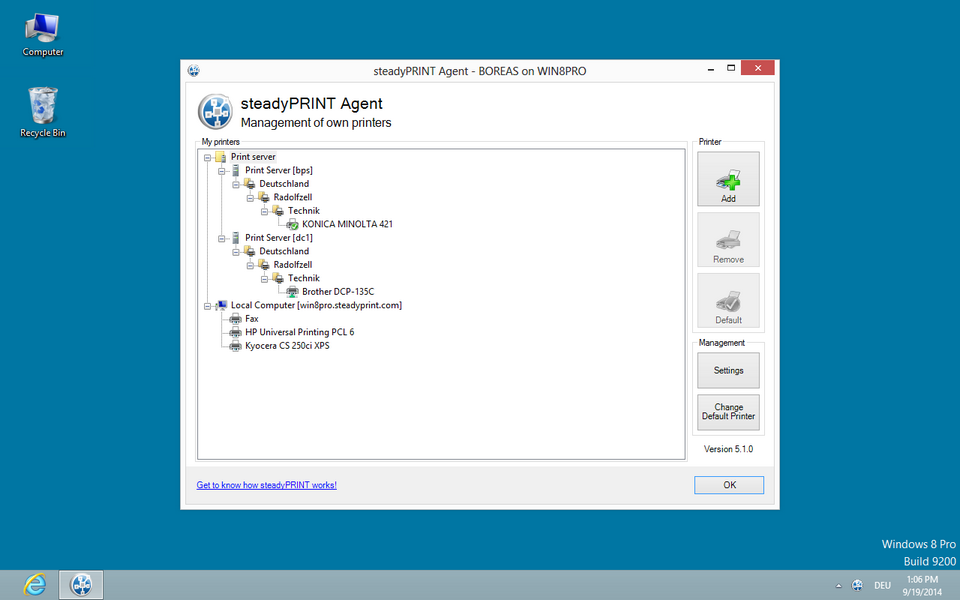
The steadyPRINT Agent offers special functions for printer administration that can be carried out by the user. The following figure - steadyPRINT Agent - main window shows the main window intended for the user.

Figure 76: steadyPRINT Agent – main window
In the following table you will find all functions that are available to the user on the client side:
Function |
Description |
Add |
The Add button allows the user to add network printers administered by steadyPRINT. |
Remove |
The Remove button allows the user to remove network printers administered by steadyPRINT. This only applies to network printers which have been connected per user-based assignment. If the printer in question has been connected per Group or Computer Assignments, the user cannot remove this network printer. |
Set Default Printer |
The Default button allows the user to set a printer as a default printer. |
Settings |
This allows the user to enable (disable) the notification window and the taskbar icons as well as to set the language. |
Change Default Printer |
Enables the change of the default printer for a site where the user is located. The site mapping is located in the steadyPRINT’s folder structure. |
Open Windows Printer Directory |
Using the local computer’s context menu, the user can open the Windows Printer Directory. Alternatively, it is also possible to open it using the tray icon in the taskbar. |
Print Jobs |
The user can use the context menu of the respective printer to open the print queue. |
Set as Default Printer |
The user can use the context menu of the respective printer to designate it as default printer. |
Printer Properties |
The user can use the context menu of the respective printer to open its properties. |
Printer Description and Status Information |
When the user holds the mouse cursor over a particular printer, an additional description and the current status information of the device is displayed. In addition, the status is signaled with a symbol.
If steadyPRINT ascertains an error for a particular device, the user can independently determine by using the status information if a paper jam has occurred, for instance, or if the toner needs to be replaced. |
Open steadyPRINT Agent |
Using the tray icon in the task bar you can open the steadyPRINT Agent. Alternatively, you can also double-click on the Agent symbol. |
Reconnecting Printers |
Using the context menu in the steadyPRINT Agent main window and tray icon, the user can manually reconnect printers. |
Open User Manual |
Opens the steadyPRINT Agent User Manual. |
Support |
Opens the support window with useful information for the administrator on the current configuration of the steadyPRINT Agent. |
Terminate |
You can stop the steadyPRINT Agent by using the tray icon in the task bar. |
A short explanation of the functions and handling of the steadyPRINT Agent is available for users as a handout on the homepage www.steadyPRINT.com. You can download it for use as a PDF file.
Changes of the printer assignment by Administrator
At each start and in a defined interval (adjustable via performance profiles), the steadyPRINT Agent checks the changes to the printer connections. In addition, the steadyPRINT Center sends push notifications to the respective Clients when printer assignments are added or the detail window of the Active Directory is modified by the administrator.
Note |
Push Notifications |
|
By default, the push notifications use 8009. This can be modified via the settings in the steadyPRINT Center. |