Installation WebCenter(Last update of this topic: 06-02-2023) |
  
|
(Last update of this topic: 06-02-2023)
Installation WebCenter(Last update of this topic: 06-02-2023) |
|
Choose the steadyPRINT WebCenter component in the steadyPRINT Installation components.
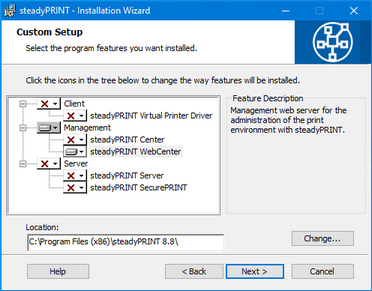
Figure 11: Installation of WebCenter
The next installation step, see figure Installation - Credentials, requires the entry of the Domaine Authentication Data (Credentials) of a Windows user. For a usual installation, you can leave the fields empty. This means that the localsystem user is used. To complete the installation click the button Next.

Figure 12: Installation - Credentials
Important |
Installation of the Service component(s) fails |
|
In order to install the steadyPRINT WebCenter component you must have sufficient administrative rights.
Please make sure before that the ASP.NET Core 5.0 Runtime Windows Hosting Bundle has been installed.
When indicating a service account please make sure that the specified user has been added to the local security policy Run as a service.
As an alternative, you can continue the installation step with a blank password by using the local system account localsystem which has been pre-defined by default.
For more detailed information (technical background) please refer to chapter Support. |
Configuration of Ports
The WebCenter comprises two services, the steadyPRINT WebCenter and steadyPRINT AD Service.
In case the default port is desired to be adjusted, this must be done manually via the respective configuration file appsettings.json.
Adjustment of port for steadyPRINT AD Service
Open the configuration file [Install]\install.AdService\appsettings.json. Subsequently, the adjustment is done via the property ServerDefaultOptions.HttpsPort of the HTTPS ports.
In the next step the adjustment of the ports in the configuration file [Install]\install.WebCenter\appsettings.json has to be repeated. For this purpose, the HTTPS port has to be assigned with the value entered before. In any case, make sure that both HTTPS ports are the same. Otherwise, the steadyPRINT WebCenter and steadyPRINT AD Services will not be able to communicate.
Adjustment of ports for steadyPRINT WebCenter
Open the configuration file [Install]\install.WebCenter\appsettings.json. Subsequently, the adjustment of the ports (for http(s)) is done via both properties Kestrel.Endpoints.Http.Url and Kestrel.Endpoints.Https.Url.
Restart the service steadyPRINT AD Service after adjusting the ports.
Configuration of Certificate for WebCenter
Open the configuration file [Install]\install.WebCenter\appsettings.json. Subsequently, the adjustment of the DNS name which is to be accessed via the WebCenter is done via the adjustment of the property Certificates.Default.Subject.
Make sure that a valid and suitable certificate has been stored to the certificate store of the local computer (local machine certificate store), so that the DNS name correspond to the applicant of the certificate (subject).
Restart the service steadyPRINT WebCenter after adjusting the ports.