(Last update of this topic: 05-22-2015)
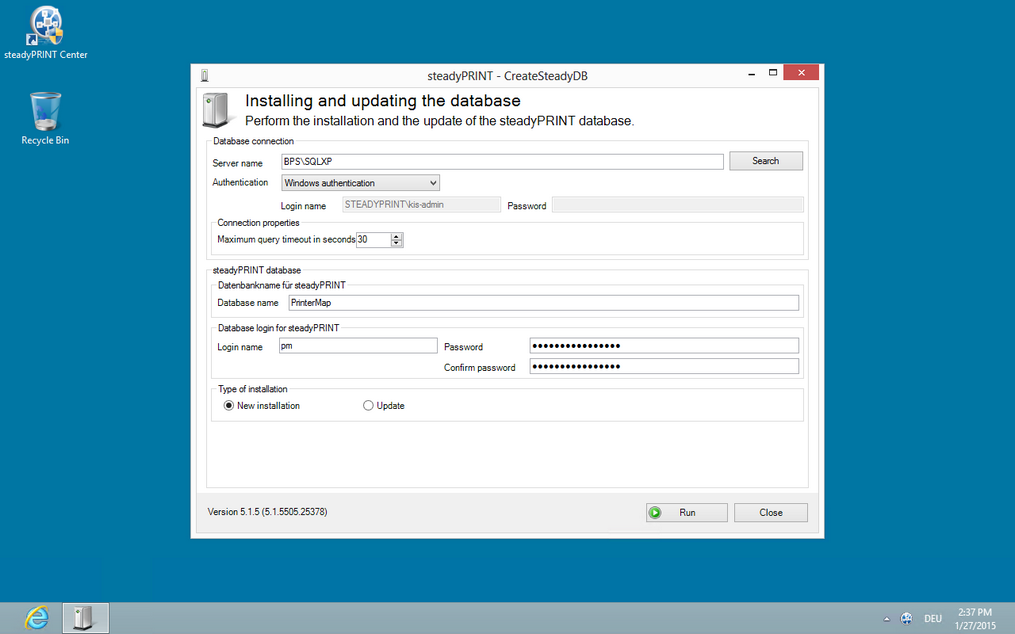
For the use of steadyPRINT it is necessary to install the steadyPRINT database. The set-up is done with the help of the CreateSteadyDB application provided. Start up this application with a double click. The following Figure - Installing the database with CreateSteadyDB shows the application after start up with filled-in database and credential information.

Figure 2: Installing the database with CreateSteadyDB
Database Connection
Enter the name of the database server or the database instance on which the database is to be set up.
Subsequently, select the required authentication at the database server:
| • | Windows authentication: Uses the currently logged-in user for the connection to the server. |
| • | SQL Server authentication: In this case, a SQL login with all respective System Administrator (sa) authorizations has to be entered in order to be able to access the database server or the database instance and to create a database. |
Important |
Setting up a steadyPRINT Database with Windows Authentication |
|
The currently logged-in user must at least have the authorizations of the dbcreator and securityadmin roles on the database server.
For further information regarding the Microsoft SQL server roles, please refer to http://msdn.microsoft.com/en-us/library/aa337562(v=sql.110).aspx. |
Important |
Setting up the steadyPRINT Database with SQL Server Authentication |
|
Enter the user log-in data of an SQL System Administrator (sa) in order to successfully conclude full implementation of the process.
Here, the CreateSteadyDB application expects the user log-in data of an SQL System Administrator or an equivalent account with "sysadmin" server role status.
For further information (technical background) please refer to the steadyPRINT website www.steadyPRINT.com under FAQ/Technical Support. |
Extended Connection Parameters
For the creation and the update of the database, the CreateSteadyDB sends SQL instructions to the SQL server. If the process is not executed within the specified time frame, the current action is aborted and the error message "query timeout expired" is displayed. This problem frequently occurs if the server is fully utilized or the instruction to be processed cannot be executed quick enough due to their complexity. The increase of the max. query time out guarantees a successful execution of the necessary SQL instructions.
steadyPRINT Database
Enter the name of the steadyPRINT database used to create the database on the database server. When updating the database, enter the recently used steadyPRINT database name.
Important |
Old Database Name |
|
Since version 5.0.1 the name of the steadyPRINT database can be freely selected. In older versions, the name PrinterMap was used by default for the installation. |
Database Login for steadyPRINT
At this juncture, the entry of a separate database user for the steadyPRINT Database will be made. The user is automatically created by using the entered login which is later necessary when Installing the Program Components. When updating the database, the recently used login is required.
Note |
Update - Using another Login |
|
In the course of updating the steadyPRINT database, a new user can be specified. This is automatically done by CreateSteadyDB by using the given login. Activate the checkmark Create as new Login (only available with installation type Update). |
Installation Type
Here, you have two options to choose from, to be more precise, either a new installation of steadyPRINT or an upgrade of the steadyPRINT Database currently in operation. The latter carries out an adjustment of the database to a newer version that is equivalent to the steadyPRINT Components currently in use.
Provided that a steadyPRINT database has not yet been set up on the database server or database instance, or if you would like to discard an existing steadyPRINT Database, select the New Installation option.
Should a database from an earlier version of steadyPRINT already exist on the database server or database instance, it is possible to update it to the current version. To do so, select the installation type Upgrade.
Starting the Database Installation
After the necessary entries have been made, the new installation or update of the steadyPRINT databse is initiated via the Install button.